How to Fell a Tree With a Chainsaw: Notch, Back Cut and Escape Route
Before felling, assess lean, defects, wind, overhead hazards, and the drop zone; don’t proceed if conditions are uncertain or side lean exceeds 10% of tree height.
Clear two escape routes roughly 45 degrees away from the fall line, and wear full protective gear.
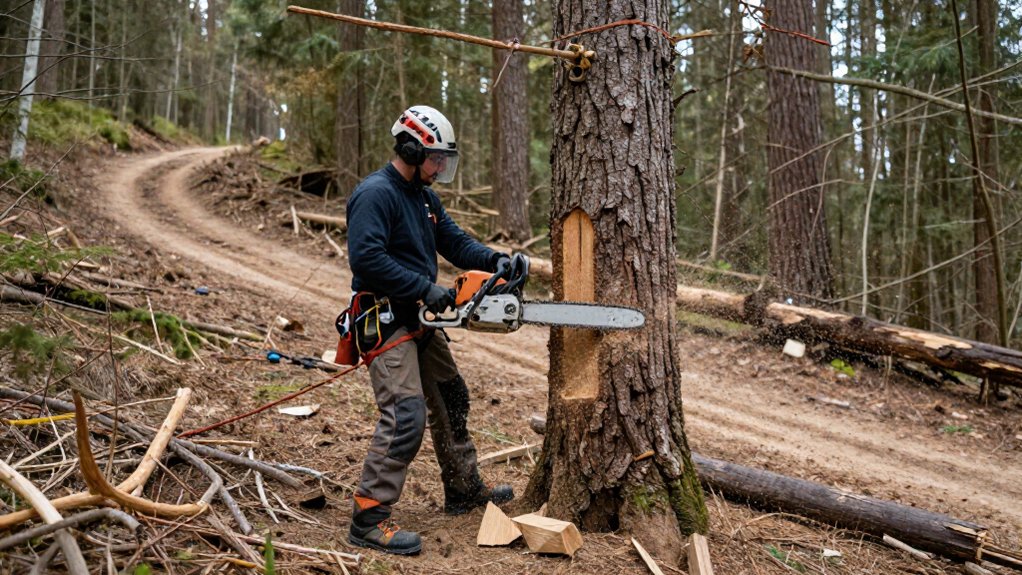
Cut an open-faced notch, then make a level back cut, stopping to preserve an even hinge near 10% of trunk diameter.
Retreat promptly; leave hung trees to professionals. Checks and precautions follow.
Notch and Back Cut Geometry
A sound notch-and-back-cut layout gives you control of the tree’s fall. Make an open-faced notch on the intended fall side, using an opening greater than 70° to keep the hinge engaged longer than conventional cuts. Cut a level bottom, then make the top cut meet it cleanly at your planned angle.
The hinge is the uncut wood between the notch apex and your back cut. It guides the tree, so keep it uniform across the trunk and don’t cut through it. Aim for hinge thickness near 10% of trunk diameter, though tree and method affect dimensions. Keep your back cut level and square to the hinge. A raised back cut can form a shelf that helps resist the tree sliding back off the stump.
Assess Tree Lean and Hazards
Before approaching the felling cuts, put on a hard hat and assess the tree’s height, lean, likely fall path, and drop zone. Check lean along the intended fall line and perpendicular to it; side lean exceeding 10% of tree height means you shouldn’t attempt the fell. Use a vertical stick at arm’s length on the fall line to estimate height and landing point, adjusting for slope and lean.
- Inspect for widowmakers, dead tops, rot, unstable roots, vines, cavities, and nests.
- Identify power lines, buildings, roads, and people near the potential drop zone; any exposure may make felling unsafe.
- Evaluate canopy branch size and distribution, wind, and ground conditions; each can shift balance or compromise the landing area.
Stop and seek qualified help when uncertain.
Step 1: Clear Brush From Escape Path
Once you’ve assessed the tree and hazards, clear your escape path before making any cuts.
Choose a clear route that leads back and away from the fall direction at roughly a 45-degree angle; don’t retreat straight behind the tree. Before cutting, remove brush, undergrowth, low branches, and debris that could trip you or snag your clothing. Allow about five to ten minutes to prepare the path, and plan a second route if the first becomes blocked.
Walk the route to find hazards you might miss while looking from the stump, including rocks, uneven ground, and slippery patches. Clear enough space for an unobstructed retreat. Keep watching the tree and falling debris as you retreat.
Step 2: Gather Required Felling Equipment
With your escape path clear, gather and check all equipment before starting the saw. Put on a hard hat, eye and hearing protection, chainsaw chaps or pants, protective gloves, and boots with protective toes. Don’t start work without this equipment.
Inspect a well-maintained chainsaw with power, a sharp chain, and a bar suited to the tree. Check that the chain brake works, chain tension is set, and the bar-oil supply is adequate. Bring plastic felling wedges and an axe or hammer to drive them; keep wedges clear of the moving chain.
Carry a first-aid kit with supplies, a charged phone, and a spare sharpened chain loop. If lean requires a rope, throw line, or mechanical aid, have equipment ready. If you lack it, postpone the job.
Step 3: Leave Hinge Wood Intact
Leave a continuous, evenly thick strip of uncut wood—the hinge—between the notch apex and the back cut. This hinge guides the tree toward your intended direction; preserve it evenly and keep both outer corners intact. About 10% of trunk diameter is a common rule of thumb, but the right thickness depends on the tree and cutting method. Don’t treat that figure as fixed; assess the tree and use an appropriate felling plan.
Mark a stopping line behind the notch before making the back cut. Watch the cut’s progress and stop at that line, rather than cutting into the hinge. If you leave the hinge too thin or sever it, the tree may fall out of control. If it’s too thick, it may not fall as intended.
Step 4: Start Chainsaw From Ground
Start the chainsaw on cleared, level ground with the bar unobstructed and the chain brake engaged. Before starting, consult your saw’s owner’s manual and follow its procedure for ignition and choke settings.
Hold the top handle firmly, and secure the rear handle as directed; keep your foot clear of the throttle. Pull the starter rope sharply, following the manual’s specified stance and sequence.
Once the engine starts, briefly rev it to disengage the choke, then let it idle. Allow the saw to warm up before checking that the chain brake engages and releases correctly.
Then verify that oil reaches the bar tip, following the manufacturer’s test method. Keep the bar clear of people, objects, and debris throughout starting and checks. Wear required protective equipment.
Step 5: Prevent Saw From Pinching
Before making the back cut, assess the tree’s lean and condition; back lean or instability can cause the kerf to close and trap the saw. Keep plastic felling wedges and a hand axe on site. Insert a wedge into the back cut as soon as there’s room behind the bar, keeping it clear of the moving chain.
Drive it to hold the kerf open against the tree’s weight. Cut only far enough to set the wedge; preserve the planned hinge, since excess cutting can weaken or remove it. If the bar pinches, stop; don’t force or twist the saw. A spare bar may help free it. Keep your footing and reassess the kerf before continuing; engage the chain brake if you need to pause work safely.
Step 6: Call Professionals for Hangers
If a tree gets caught in another tree instead of falling freely, it’s a hung-up tree and may drop or shift without warning.
Treat it as an uncontrolled hazard, not a cutting problem you can solve with your saw. Don’t climb the trapped tree, cut it, or try to push or pull it free with a chainsaw, tractor, or vehicle; movement can trigger sudden falling or breakage. Keep everyone well outside its potential fall and debris zone, and never work beneath it.
Call a qualified tree-care professional equipped to handle hangers. A trained operator may use a logging winch to bring one down from farther away. If it creates an immediate hazard, keep people away and contact emergency services or the appropriate local authority.
Confirm the Tree Landed Safely
As the tree falls, keep moving along your planned escape route at roughly a 45-degree angle from the fall line, watching it without turning your back. Stay alert for branches and debris that may be thrown or dislodged during impact. Don’t linger at the stump or retreat straight behind the trunk; either position can expose you to falling limbs or sudden movement.
Wait until the trunk and branches have stopped moving, then verify the tree is down and the area is stable before you approach. Look for shifting limbs, rolling sections, and hazards underfoot as you assess the landing. If the tree hangs up in another tree, keep clear; don’t pull it down by hand or with a vehicle. Get trained help and suitable equipment.
Stuck Chainsaw Bar Troubleshooting
A chainsaw bar can become pinched as the tree shifts, so stop the saw and engage the chain brake before trying to free it; never pull or twist a running saw.
Keep plastic felling wedges and a hand ax or hatchet nearby. If safe, drive a wedge into the kerf to hold it open; a spare bar may help release the trapped saw. Don’t use a vehicle or force that could damage equipment or destabilize the tree.
| Situation | Safe response | Avoid |
|---|---|---|
| Pinched bar | Wedge kerf open | Pulling saw |
| Unstable tree | Check movement; clear fall path | Removing wedge blindly |
| Cannot free | Leave saw; get help | Cutting near trapped bar |
Check movement before removing a wedge or freeing the bar, and stay clear of the likely fall path.
Clean the Air Filter
Before felling, clean the chainsaw’s air filter as part of your pre-use maintenance, following the owner’s manual for the correct method and service interval.
A clean filter supports airflow and helps your saw operate as intended; don’t treat it as optional before a felling cut.
With the engine off and cool, remove the filter as directed. Clean it only by the procedure specified for its material; an unsuitable method can damage it or leave debris behind.
Inspect the filter after cleaning. If it’s damaged or you can’t clean it properly, replace it before operating the chainsaw. Reinstall it securely, then check that the cover is seated correctly before starting. Don’t start the saw with the filter loose or removed: debris can enter the engine.
Conclusion
Before you fell a tree, assess its lean, hazards, and landing zone; clear two escape routes, and gather proper protective equipment. Make precise notch and back cuts, preserving hinge wood to guide the fall. Don’t cut trees with hangers, uncertain lean, or nearby hazards; call a qualified professional.
After the tree lands, confirm it’s stable before approaching. If your bar gets pinched, shut off the saw before freeing it. Clean the air filter only after the saw cools. Safety comes first.