Are Chainsaw Chains Interchangeable Between Brands? What Must Match
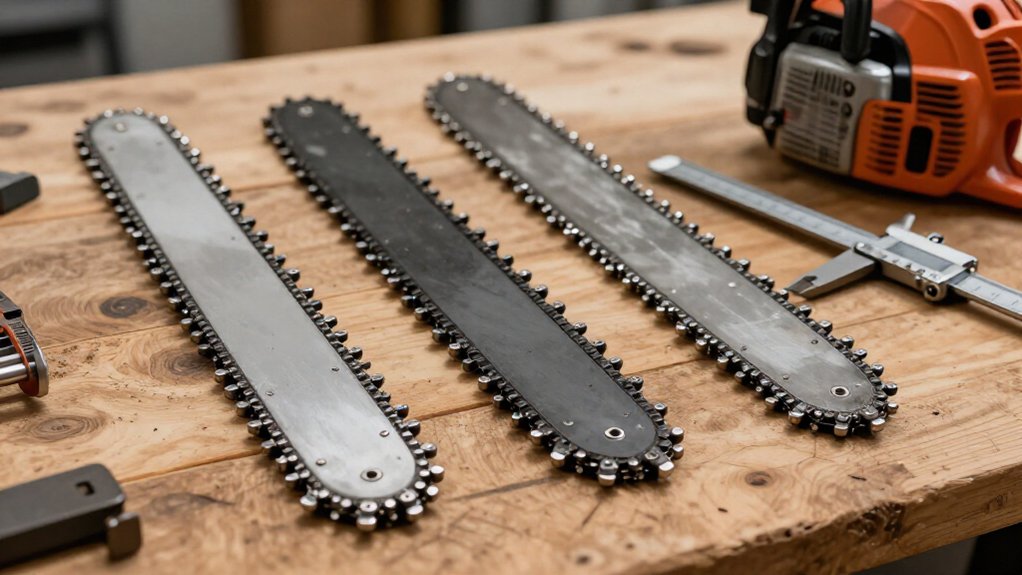
Chainsaw chains can cross brands, but you can’t choose by logo alone. Match the chain’s pitch to the drive and bar-nose sprockets, its gauge to the bar groove, and its drive-link count to the saw and bar.
Confirm that the chain profile is approved for both, and check the saw manual and bar markings before ordering.
A replacement bar may need a different loop length. Next, see how cutter styles, oiling, and safety affect selection.
Brand Compatibility at a Glance
A chain from one brand may fit a saw from another because compatibility depends on specifications, not the logo. You can use an aftermarket chain when its design suits your equipment and the saw or bar manufacturer approves that chain type and profile. Before ordering, check your exact saw model, the guide-bar markings, and the manual; brand names and nominal bar length alone don’t identify a compatible replacement.
Use those references to confirm the specified chain rather than assuming that chains sold for another brand—or for a similarly sized bar—will work. If details conflict, pause and contact the equipment maker or a qualified dealer before fitting a chain. This simple check helps you avoid unsafe substitutions, poor cutting performance, and unnecessary returns.
Matching Drive-Link Dimensions
For a chain to fit correctly, match its pitch to the drive and bar-nose sprockets, its drive-link gauge to the bar groove, and its drive-link count to the saw and bar. Common pitches include 1/4, .325, 3/8, and .404 inch; use your saw’s specified pitch. Gauge is link thickness; common values are .043, .050, .058, and .063 inch.
If the gauge is wrong, the chain won’t seat in the groove. Drive-link count determines loop length and usable tension range, so match the count your setup requires.
Don’t choose by nominal bar length alone: bars of the same length can need different counts. Check the bar stamp or saw manual; if neither lists the count, count the drive links on your chain before replacement.
A 16-Inch Bar Swap
A 16-Inch Bar Swap
When swapping to a 16-inch bar, don’t assume your current chain will fit just because the bar length matches. Two bars with the same nominal length can use different drive-link counts; a replacement may call for 55, while your original chain has 56. Before installing a chain, read the specifications stamped on the replacement bar and match its pitch, gauge, and required drive-link count. Check your saw’s manual to confirm that the chain profile is approved for both the saw and bar.
After fitting it, verify that each drive link seats in the bar’s groove and that the chain runs around the sprocket. Adjust tension according to your saw’s specified range; the chain should stay seated while moving freely by hand with gloves on. If it won’t seat or you can’t set tension within that range, don’t start or run the saw.
Full-Chisel vs. Semi-Chisel
Choose full-chisel cutters for faster, efficient cutting in clean softwood, but expect frequent sharpening and greater kickback risk. Semi-chisel cutters cut more slowly, yet hold their edge longer in hard, frozen, or dirty wood and generally reduce kickback risk. Before choosing either style, confirm it’s approved for your saw and match the chain’s pitch, gauge, and drive-link count to your bar.
Cutting Speed and Efficiency
Full-chisel cutters have sharp, square corners that split wood fibers efficiently, so they cut faster in clean softwood. Semi-chisel cutters use rounded corners, which engage fibers less aggressively and generally produce a slower cut.
You’ll get the greatest throughput from a full-chisel chain when the wood is clean and the cut is continuous. Its more aggressive cutting action can reduce time per cut, especially during routine bucking of softwood logs. A semi-chisel chain trades some cutting speed for a less aggressive cutter profile.
In comparable conditions, you’ll usually need more time to complete the same cut with it. Match cutter style to your workload: choose full chisel when clean softwood and speed are priorities; choose semi-chisel when you prefer its performance in tougher wood. Evaluate the wood you cut most often, rather than choosing by brand alone. Either style still has to match your saw’s pitch, gauge, and drive link count before installation to guarantee proper chain fit.
Durability in Dirty Wood
In dirty wood, semi-chisel cutters usually hold their edge longer because their rounded corners resist dulling from grit better than the sharp, square corners of full-chisel cutters. That edge retention matters when you cut logs carrying soil, bark, or debris: abrasive particles quickly blunt full-chisel corners, reducing bite and forcing more frequent sharpening.
Full-chisel cutters excel in clean wood, where their square profiles slice efficiently, but grit erodes that advantage. Semi-chisel’s rounded profile tolerates contamination better, so you can maintain steadier cutting performance and spend less time filing. It also performs reliably in frozen wood and generally lasts longer between sharpenings. When you expect dirty or frozen material, choose semi-chisel if preserving sharpness and reducing maintenance matter more than maximum clean-wood cutting speed overall.
Compatibility and Chain Fit
After weighing edge life against cutting speed, check whether the chain fits and is approved for your saw.
Full-chisel and semi-chisel chains can fit the same saw when pitch, gauge, and drive-link count match your bar and sprocket. But matching dimensions alone doesn’t confirm approval. Check your saw’s manual for permitted cutter profiles before you install either style.
Full-chisel cutters have sharp, square corners that cut efficiently in clean wood, but they suit dirty or frozen timber less well. Semi-chisel cutters have rounded corners, hold their edge longer in dirty or frozen conditions, and generally pose lower kickback risk.
Choose the profile for your work and skill level. If you can’t verify fit or approval, don’t run the chain; resolve the mismatch first.
Oil-Port Alignment
Your guide bar’s oil inlet must align with the saw’s oil outlet; chain specifications don’t confirm this fit. Before assembly, check that the bar matches your saw model and that its oil hole is clear and positioned over the outlet. After assembly, verify oil reaches the bar and chain as the manual directs, and don’t cut if lubrication is uncertain.
Bar Oil Port Position
Even when a guide bar fits the saw’s mount, its oil inlet must align with the saw’s oil outlet so lubricant can reach the bar groove and chain. The oil port belongs to the bar, not the chain; the chain has no inlet of its own. When you choose a replacement bar, match its oil-inlet position and port pattern to the saw’s mounting interface.
A bar’s length alone doesn’t establish compatibility: a misplaced or incompatible inlet can interrupt lubrication even if the bar mounts securely. Without oil delivery, friction and heat can quickly damage both the bar and chain. Follow your saw manufacturer’s specifications for approved bar configurations, and don’t run the saw if oil flow is absent or uncertain, even with a correctly seated bar.
Port Alignment Check
Before installing a replacement bar or chain, check that the bar’s oil inlet aligns with the saw’s oil outlet so lubricant can reach the chain groove. Oil-port positions can vary between bar mounts and brands, so matching chain pitch, gauge, and drive-link count alone doesn’t confirm proper lubrication. With the saw switched off and prepared according to its manual, inspect whether the bar inlet meets the saw outlet when mounted.
Don’t assume that a compatible chain guarantees an aligned oil path; the bar and saw must also mate. After assembly, use the manual’s recommended check to confirm oil reaches the bar and chain. If you can’t verify delivery, don’t cut. Recheck the mounting and fit against the manufacturer’s specifications before operating the saw.
Preventing Oil Blockages
To prevent oil blockages, confirm the bar’s oil inlet aligns with the saw’s outlet and that both are clear of sawdust and debris. Before fitting a replacement bar or chain, inspect the port path so lubricant can enter the chain groove. Clear debris from the saw’s outlet and the bar’s oil holes; even partial blockage can interrupt lubrication.
Check that the holes remain open and correctly positioned for your saw’s oiling system, because bar mounts and port layouts vary. After installation, follow your manual’s procedure and verify that oil reaches the bar and chain before cutting. If flow’s absent or uncertain, stop the saw and correct the blockage or alignment; don’t run the chain dry. Recheck flow after any adjustment before you resume work.
Husqvarna-to-Stihl Chain Swap
A Husqvarna chain can fit a Stihl saw, or the reverse, only when the saw, bar, and chain are approved to work together. Match the chain’s pitch, gauge, and drive-link count to the guide bar and saw. Its pitch must also match the drive sprocket and, when fitted, the bar-nose sprocket.
Don’t choose by nominal bar length alone: two 16-inch bars may need 55 and 56 drive links, so those loops won’t interchange. Check the bar stamp and your saw manual for specifications and approved chain profiles; bar mounts and configurations can change the required loop length.
Before cutting, confirm the chain seats correctly, runs in the right direction, tensions properly, and receives lubrication. If fit or approval remains uncertain, don’t use it on that saw.
Low-Kickback Chain Requirements
Low-kickback chains use safety features designed to reduce kickback risk, but they must still match your saw and bar’s pitch, gauge, and drive-link count.
| Check | Why it matters |
|---|---|
| Manual | Confirms approved profiles |
| Green mark | Identifies ANSI-compliant chains in North America |
| Setup | Correct assembly and working guards remain essential |
Check your manual before buying a replacement; some saws don’t permit every low-kickback profile. If you lack kickback training, choose an approved low-kickback chain, but don’t treat it as a substitute for safe operation or protective equipment. Fit the chain correctly, then verify that the chain brake, front hand guard, and other safety components are securely attached and functional. A green mark helps identify an ANSI-compliant chain in North America; it doesn’t confirm fit by itself.
Carbide Doesn’t Mean Universal
Although carbide-tipped chains resist wear in dirty, muddy, icy, or waterlogged wood, they aren’t universal: match the chain’s pitch to the drive sprocket and any bar-nose sprocket, and match its drive-link thickness and count to the bar and saw. Also confirm that both manufacturers approve carbide for your model; its cutting demands may exceed a lower-powered saw’s capacity.
- Match the chain’s gauge to the bar groove; the drive links must seat fully.
- Use the specified drive-link count so the chain fits the bar and saw.
- Confirm carbide compatibility in both manuals before installation.
After fitting, verify that the chain seats correctly and tensions within the manual’s stated range. Don’t assume carbide construction overrides any size, power, or approval requirement for your specific equipment before you begin any cutting.
Check the Bar’s Drive Sprocket
Before fitting a chain, match its pitch to the saw’s drive sprocket and the bar-nose sprocket, if fitted. Common pitches include 1/4-inch, .325-inch, 3/8-inch, and .404-inch, but don’t assume a chain fits because its brand matches or its bar length looks right. Check the pitch stamped on your guide bar or listed in the saw manual, then confirm the sprocket’s approved for that chain.
If the marking’s missing or unclear, ask a servicing dealer to identify the sprocket and specify a compatible chain for your saw. Never run a chain that doesn’t mesh correctly with the drive sprocket. It may bind, derail, or damage the sprocket and other components. After installation, rotate the chain by hand with the engine off and verify smooth engagement; stop if it catches or sits unevenly.
Brand names don’t override pitch requirements. Use only the specified combination before cutting with your saw.
Conclusion
Before you swap brands, verify the chain’s pitch, gauge, drive-link count, and compatibility with your bar and sprocket. A 16-inch label alone doesn’t confirm fit, and matching dimensions won’t guarantee oil-port alignment or operation. Check the saw and bar manuals, then inspect tension, lubrication, and cutting performance at low speed. If any specification differs, or you can’t confirm it, don’t install the chain. Choose a compatible replacement instead; you’ll avoid damage, poor cuts, and kickback.