How to Choose a Chainsaw Helmet: Face Shield, Ear Muffs and Fit
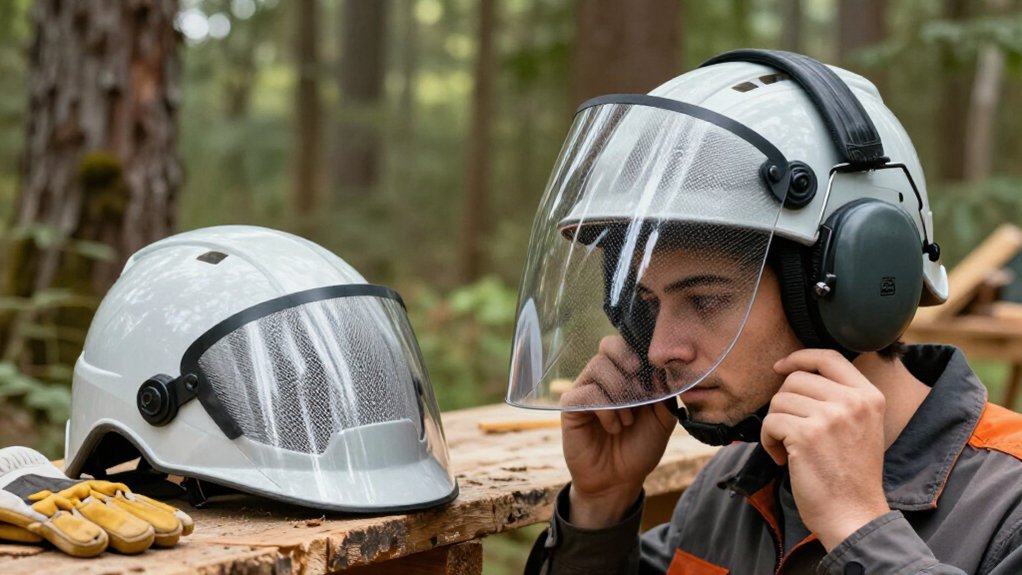
Choose a chainsaw helmet certified for your task; verify exact shell markings, not just a CE claim. Select a clear visor for fine particles or a mesh visor for airflow and coarse debris, adding goggles where needed. Check visor impact ratings and compatible, rated earmuffs with sealed cups.
Test eyewear and respirator clearance, adjust the chinstrap snugly, and check stability. Compare weight and replacement costs; inspect parts. More checks can help you choose well.
Clear Versus Mesh Visors
Choose a chainsaw visor based on the debris you’ll face and the visibility you need. A clear polycarbonate visor gives you broad face coverage and crisp sightlines when you need to see details clearly. It can fog, so check whether its ventilation suits your working conditions.
A mesh visor lets air pass and resists fogging, making it practical for coarse wood chips and forestry debris. However, fine sawdust may pass through the mesh. Wear suitable goggles beneath it when the task could expose your eyes to fine particles. Choose clear material for broad face protection and unobstructed visibility; choose mesh when airflow and resistance to fogging matter and the debris is coarse. Keep the visor clean, and replace it if cracks or damage impair protection.
Assess Debris and Noise
Assess Debris and Noise
What hazards will you face while cutting? Identify whether your work exposes you to falling branches, wood chips, sawdust, or other flying debris. These hazards determine the head and face coverage you need. Choose a clear visor for transparent coverage, or mesh for airflow and coarse forestry debris; mesh can let fine sawdust through.
Chainsaw noise near you can reach about 100–120 dB. Select helmet-mounted earmuffs with a stated noise-reduction rating suited to your workplace risk assessment. Check that each cup seals around your ear; a poor fit reduces protection.
Keep cushions clean and replace worn foam inserts. Match the helmet, visor, and earmuffs to your task, then move and confirm the complete setup stays secure. If debris or noise conditions change, reassess protection.
Visor Impact Rating
Check the visor’s impact rating and certification in the product documentation; clear polycarbonate provides face coverage, but its appearance and material don’t prove it can withstand high-impact debris. Match the documented rating to the hazards and applicable standards for your task. Steel mesh admits airflow and can deflect coarse chips, but fine sawdust and small particles may pass through. Choose clear or mesh protection for debris and visibility; add suitable eye protection if the visor won’t cover the hazard. Inspect it before each session, and replace it if cracked, warped, or otherwise damaged.
| Hazard or condition | Practical check |
|---|---|
| Clear visor | Confirm rating suits impact risk |
| Steel mesh | Coarse chips only; fine particles may pass |
| Damage | Replace cracked or warped visor |
Your visor must match the task, not appearance.
Compare Helmet Shell Materials
Compare ABS and HDPE by checking the exact model’s specification; some listings give conflicting material descriptions. Weigh shell comfort against protection: ABS offers impact resistance and durability, while heat resistance and system weight also affect long shifts. Confirm the model’s certification, replace it after a hard impact, and follow the manufacturer’s service-life guidance.
ABS Versus HDPE
Although ABS and HDPE are both common chainsaw helmet-shell plastics, neither material alone confirms that a helmet meets a specific safety standard. Both can form protective shells, but performance depends on the helmet design and tested configuration. Check the model’s certification, impact-protection rating, listed weight, and intended use; don’t infer suitability from a label such as “ABS” or “HDPE.”
Product listings can also conflict: the GREEN DEVIL forestry helmet is described as high-quality ABS and elsewhere as high-density polyethylene (HDPE). If you see inconsistent material claims, ask the manufacturer to confirm the shell’s composition before buying. Inspect your helmet regularly for cracks, warping, or impact damage. After a significant impact, replace it, or follow the manufacturer’s replacement guidance even if damage isn’t obvious.
Shell Weight And Comfort
How much a helmet weighs can affect comfort over a long shift, but the shell material alone won’t tell you how tiring it’ll feel.
Compare complete-system weight: GREEN DEVIL weighs 2.44 lb; listed alternatives weigh about 1.8 to 2 lb. Its description specifies ABS but also mentions high-density polyethylene, so confirm the exact model’s shell material before comparing.
A lighter option such as the roughly 1.8-lb NoCry may feel less tiring, but suspension and fit matter too. Check that the suspension sits securely and distributes pressure; a balanced fit can help reduce neck fatigue. Oregon’s 2-lb helmet pairs its shell with soft-feeling suspension designed to help reduce fatigue during extended use.
Adjustable vents let you open or close them to suit weather conditions during work comfortably.
Impact And Heat Resistance
Because a chainsaw helmet must withstand impacts, check its certification and shell specifications rather than relying on material names alone. ABS shells can resist impact, and manufacturers may use high-quality ABS in forestry systems. Still, a material label doesn’t establish that a helmet meets your work’s requirements. Check the model’s certification; for example, the GREEN DEVIL lists ANSI Z89.1-2014 and ANSI Type I protection. Confirm that its rating suits the hazards you face.
Don’t infer heat resistance from “ABS” or any other material name. Compare the manufacturer’s documented temperature limits and applicable safety certifications before working around heat. GREEN DEVIL’s technical details identify ABS, while its product description calls the shell high-density polyethylene. When descriptions conflict, ask the seller or manufacturer to clarify.
Durability And Replacement Signs
Durability depends on the helmet’s exact design, care, and exposure, not just its shell material. Compare each model’s specifications rather than assuming all materials perform alike. An ABS shell such as the GREEN DEVIL’s high-quality ABS shell is designed for impact resistance, but that label alone doesn’t establish how another helmet will perform.
Inspect the shell before every work session and check for cracks, warping, or other damage. Replace the helmet if you find any defect. After a hard impact, replace it even if you can’t see damage; impact may compromise protection.
Follow the manufacturer’s expiration guidance. As a general rule, many helmets need replacement every three to five years, depending on use and exposure. Prolonged direct sunlight can accelerate wear, so keep it shaded.
Verify Helmet Safety Certification
Check that the exact helmet model meets your worksite’s requirements, such as ANSI Z89.1-2014 or EN 397, and verify its protection type and rating. Don’t assume the visor and earmuffs share the helmet’s certification; confirm each component’s compatibility and applicable ratings, including EN 352-3 or SNR details for helmet-mounted earmuffs. Read the product labels and documentation, and don’t rely on a guarantee or a general “CE approved” claim in place of the required certification.
Check Applicable Safety Standards
Before you buy, verify that the certification covers the exact helmet model—not just its brand or product family.
For U.S. industrial head protection, check the applicable ANSI Z89.1 rating. The GREEN DEVIL system is listed as ANSI Z89.1-2014 Type I; confirm that this classification matches your task. In Europe, look for applicable EN 397 certification and confirm it in the product documentation.
Assess components separately: your visor and earmuffs must meet standards too. Helmet-mounted hearing protection may specify EN 352-3 or an SNR rating. Don’t assume a certified shell makes every attached component compliant.
Compare the complete helmet, visor, and earmuff setup with your worksite’s hazards and required protection level. Ask your supplier or safety officer to resolve any uncertainty before use.
Verify Certification Markings
Match the certification marking on the helmet shell to the rules for your region and workplace, such as ANSI Z89.1 or EN 397. Check that it identifies your exact helmet model; a mark on a visor or earmuff doesn’t certify the shell. For an ANSI-rated helmet, read the label for its type and class. The GREEN DEVIL system is listed as ANSI Z89.1-2014 Type I; don’t assume another model shares that classification.
Read the product documentation and inspect the label before use. Also verify that your face shield and earmuffs carry their own applicable ratings, because the helmet’s certification doesn’t automatically cover accessories. Replace the helmet after a significant impact or when its service life ends. Repeat this check when you replace it.
Confirm Component Compatibility
Certification marks confirm the shell’s rating, but they don’t automatically approve its accessories.
Check that your exact helmet model carries certification to a standard suited to its intended use, such as ANSI Z89.1 in the U.S. or EN 397 in Europe. Verify the model’s approval on its label or in product documentation; don’t rely on a broad product description.
Next, confirm the visor and earmuffs are approved for use with that helmet. A compatible fit matters: an unapproved attachment can compromise certified protection. Check each accessory’s applicable standard for its function, such as EN 352-3 for helmet-mounted hearing protectors.
Finally, match the complete system to your workplace requirements. A face shield or earmuffs don’t replace certified head protection; verify the helmet itself provides it.
Inspect Labels and Documentation
Check the helmet’s label and product documentation to verify that its specific model is certified for your intended work. For U.S. industrial head protection, look for the applicable ANSI Z89.1 marking; the GREEN DEVIL system is listed as ANSI Z89.1-2014, Type I. In Europe, verify applicable EN 397 certification; a general CE claim alone doesn’t establish that the helmet meets this industrial helmet standard.
Then check documentation for the visor and earmuffs separately, including EN 352-3 or SNR details where applicable. Confirm certification covers the complete helmet system with its installed accessories, not merely the shell. If records don’t identify your exact configuration, ask the supplier before use; don’t assume compatible parts are certified together. Keep the documentation accessible so you can verify ratings.
Check Eyewear and Respirator Clearance
Make sure the helmet’s visor and earmuffs leave your safety glasses or goggles in position and, if needed, let your respirator seal firmly against your face. Check that the visor and earmuffs don’t push eyewear out of position or break its seal. A clear polycarbonate visor provides face coverage, but it doesn’t replace safety glasses or goggles when your task requires eye protection. If you wear a respirator, check that you can use it with the helmet, face shield and earmuffs together, and confirm it seals.
Try the complete setup before work. Move your head and check that your glasses or goggles and respirator stay secure. Raise and lower the visor; it must move freely without shifting eyewear or disturbing the respirator seal. Check earmuff fit; the cups should sit over your ears without pressing glasses arms and compromising protection. Follow the manufacturer’s compatibility guidance for helmet-mounted accessories, eyewear and respirators.
Track Replacement Part Costs
Track Replacement Part Costs
After confirming the helmet works with your eyewear and respirator, compare the cost of replacement visors, earmuff seals or inserts, sweatbands, chinstraps, and suspension parts. Check each item against your helmet’s exact model number; visor and suspension fittings aren’t universal. Ask the seller whether the visor, earmuffs, and suspension are available separately, and whether a damaged shell requires replacing the entire helmet.
Estimate ownership cost, not just the purchase price. Include shipping, availability, and how often you’ll need replacement parts, particularly earmuff seals. If an important part is hard to source, downtime can leave you without a serviceable setup.
Keep spares on hand, and follow the manufacturer’s replacement instructions. After a significant impact, replace the helmet; a cheaper component can’t make a damaged shell safe.
Inspect Ear-Muff Seal Integrity
A close earmuff seal helps limit chainsaw noise, so inspect each cushion for continuous contact with your head and no gaps. Check the cushions before each use; damage or debris can reduce contact and weaken noise protection.
- Look for cracks, hardened surfaces, flattening, or other wear; replace damaged cushions or foam inserts as the manufacturer directs.
- Wipe away sawdust and debris so nothing holds a cushion away from your head.
- After fitting the helmet, check that each muff sits firmly over an ear and seals all around.
- Move your head through normal working positions and confirm both seals stay closed without shifting.
If you can feel a gap, stop and reseat the muff; don’t rely on a damaged cushion to control hazardous chainsaw noise.
Confirm Chinstrap Adjustability
With the earmuffs sealed, check that the chinstrap adjusts snugly without restricting comfortable movement. Choose a helmet with a strap you can tighten or loosen to hold the shell securely while you move naturally.
- Fasten it, then bend, look up, and turn as you would during cutting; the strap must stay closed and the helmet must not shift.
- Check whether a molded chin cup sits comfortably and keeps the strap centered beneath your chin.
- Adjust it while wearing work gloves; confirm you can operate the fittings, ideally one-handed, without removing the helmet.
- Before each session, inspect attachment points and webbing for damage, then reset the fit if needed. Replace damaged components, and don’t cut until the helmet stays secure through every check you perform.
Conclusion
Choose a chainsaw helmet that fits securely and matches the work you do. Compare clear and mesh visors for visibility, debris, and noise conditions, and verify the visor’s impact rating. Check the shell, certification, eyewear and respirator clearance, replacement part costs, ear-muff seals, and chinstrap adjustment. Before each use, inspect the assembly and replace damaged components. A well-fitted, maintained helmet won’t eliminate risk, but it can help protect you while you’re operating a chainsaw.