How to Use Felling Wedges to Steer a Tree and Prevent Bar Pinch
Assess tree lean, crown weight, wind, and hazards before cutting; stop if you can’t control the fall zone. Use a sound plastic or aluminium wedge and wear eye protection.
Clear chips from the backcut, then place the wedge on the side likely to close the kerf, keeping it clear of the bar. Strike its heel with controlled blows; don’t stack wedges.
Check for mushrooming or cracks. Keep your escape route clear; more guidance can help.
Wedge Placement and Steering
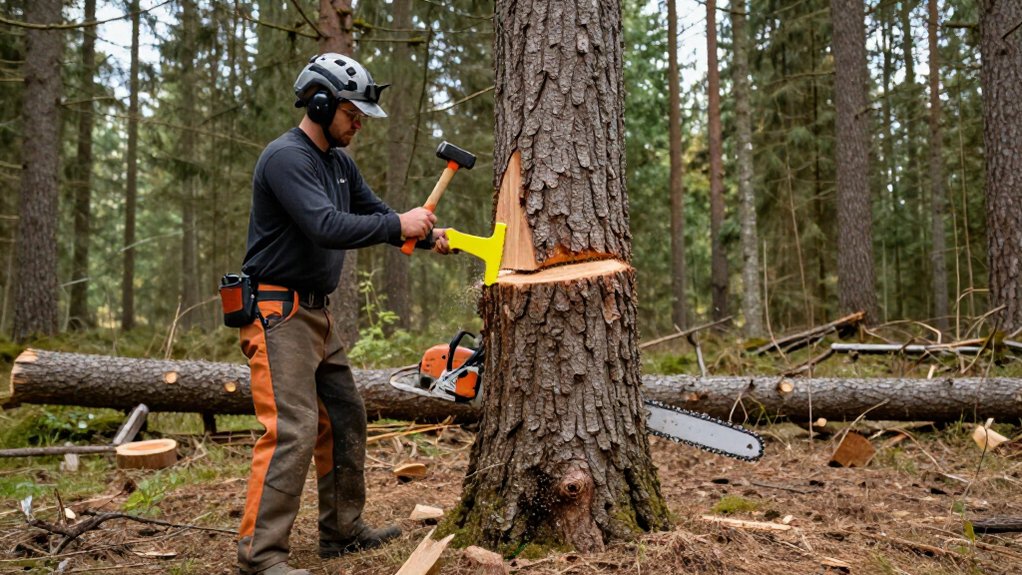
Before completing the back cut, insert a plastic felling wedge to keep the kerf open and help prevent the bar from pinching. Place it on the back-leaning or “bad” side when backlean, side-lean, or wind could close the cut and trap your bar. Drive the wedge with an axe or impact tool, using controlled strikes. This lifts the tree toward the notch and helps guide its movement over the hinge’s pivot point.
Keep the hinge intact while you drive wedges; it must guide the tree’s fall. If one wedge doesn’t provide enough lift, assess whether you can insert a second beside it. Don’t stack wedges directly because they can slip or be forced out. Position each wedge securely in the kerf before applying force.
Assess Tree Lean and Hazards
How the tree is weighted matters as much as where its trunk points. Before choosing a felling direction, assess height, diameter, trunk lean, crown and limb distribution, and wind direction and speed. Judge weighted lean: uneven limbs can shift the center of gravity away from the trunk’s apparent angle. Confirm wind remains within plan, and keep bystanders outside the fall zone throughout work.
- Inspect for decay, splits, storm damage, and tensioned limbs; severe backlean or compromised, uncertain wood requires a qualified professional.
- Check the fall zone and escape routes for power lines, roads, buildings, nearby trees, and public access; stop if you can’t control hazards.
- Agree on the work plan, clear escape routes, prepare first aid, and start only after everyone signals “thumbs up.”
Step 1: Select Compatible Wedge Material
Once you’ve assessed the tree and hazards, choose a wedge that can withstand impact without damaging your saw.
Choose high-impact plastic or aluminium; both absorb some impact. Plastic is less likely to damage your chainsaw chain if the chain accidentally cuts it. Avoid steel felling wedges: metal-on-metal contact can launch dangerous fragments. Select a wedge that’s compliant enough to cushion blows yet stiff enough to lift the tree effectively. A wedge that’s too soft may deform under striking force, while one that’s too brittle can crack.
Wear safety glasses rated ANSI Z87.1 or higher; even plastic wedges can shed pieces when struck. Before use, inspect each wedge for wear, cracks, or deep chainsaw cuts. Replace any wedge that’s heavily damaged or deeply cut.
Step 2: Clear Debris From the Kerf
Clear sawdust and wood chips from the kerf so they don’t obstruct the cut or prevent a wedge from seating securely.
Before inserting a wedge into a felling backcut, stop the saw and clear debris from the kerf. A clean kerf lets the wedge sit firmly. When bucking a log, monitor the kerf as the cut progresses. Clear debris and place a wedge behind the bar if the closing cut threatens to pinch it. If the bar becomes trapped, a tapped-in wedge may open the kerf to release it; don’t force or twist the saw. Wear safety glasses while clearing debris and handling wedges, because impacts can break off plastic fragments.
Step 3: Drive Wedge With Sledgehammer
Drive a suitable plastic or aluminum felling wedge into the back cut before completing the cut, keeping the saw clear of it. Inspect the wedge first; replace it if it’s heavily damaged or deeply cut by a chainsaw. Choose a wedge with enough lift for the tree. Its length and heel height affect leverage, and a taller-heel wedge is generally safer than stacking wedges. Use a textured model when grip matters.
Wear safety glasses: hammer impacts can break off plastic fragments. Strike the wedge’s flat heel with a sledgehammer or other suitable impact tool, using controlled blows. The wedge should lift the tree toward the notch and help prevent it from leaning back onto the saw. Keep your stance stable, maintain awareness of the tree’s movement, and stop if the wedge shifts or becomes damaged.
Step 4: Lift Tree With Wedge
Insert a plastic or aluminum felling wedge into the back cut before completing it, keeping the hinge intact, then drive the wedge with an axe or impact bar to lift the tree toward the notch. Choose wedge size and heel height for the tree’s diameter and lift; a longer wedge is easier to drive into heavier trees. It lifts the tree’s back, shifting its weighted centre past the hinge pivot so it can fall in the intended direction.
For backlean, estimate required lift and use wedges to support the tree’s weight. If one won’t suffice, assess placing another beside it; don’t stack them. Keep the hinge intact as you drive wedges; it guides the fall. Retreat as soon as the tree begins to fall.
Step 5: Watch for Hinge Splitting
As you drive wedges, watch the hinge, the strip of wood connecting the stump to the trunk, for fibers that begin to split, especially on a strongly forward-leaning tree. The hinge guides the fall, so don’t drive wedges in a way that breaks it. Splitting fibers warn that the trunk may split violently and jump backward before the cut is complete.
If the tree leans severely forward or fibers split, stop and reassess; specialized cuts may be needed. If one wedge isn’t enough, assess whether you can place a second beside it to lift weight off the first without harming the hinge. If the hinge is rotten, damaged, or splitting, or you can’t control the tree safely, stop and seek a qualified professional under these conditions.
Step 6: Remove Wedges After Felling
Once the tree is fully on the ground and stable, retrieve the wedges from the backcut. Before approaching the stump, check that no branches or trunk sections remain under tension or could shift. A loaded limb or moving stem can change position without warning and expose you to crushing or impact hazards. Read the wedge’s visible position to locate it, and plan a direct removal from the accessible side.
Don’t reach beneath the trunk or place your hand in a closing kerf; the wood may settle and trap fingers or the wedge. Pull the wedge clear only when you can grasp it without entering a pinch point. Inspect every retrieved wedge for deep chainsaw cuts, cracks, or severe deformation. Replace any wedge that’s heavily damaged.
Verify the Escape Path Remains Clear
Before cutting, clear the escape route of branches and other obstacles, and confirm it leads away from the tree’s fall path. Choose a retreat line at least 15 feet behind the stump, roughly 135 degrees from the direction of fall, where you can move without crossing the landing area. Remove anything that could catch your boots, restrict movement, or block your exit.
Recheck the route whenever the tree’s lean, wind, or obstacles could alter its fall direction. Keep the path clear throughout cutting and wedging; don’t stage tools or debris in it. Before work begins, review the escape plan with your team and wait for everyone’s “thumbs up.” If conditions change, stop, reassess the fall zone and retreat route, then resume only when everyone confirms the route remains usable.
Wedge Mushrooming
Wedge Mushrooming
Keep the escape path clear, and inspect each wedge for mushrooming after repeated strikes. Repeated impacts can flatten or spread the heel, changing the striking surface and signaling damage. Wedge durability varies by brand, so don’t assume identical service life. A widened, distorted end may shed plastic fragments when struck; protect your eyes with ANSI Z87.1-rated-or-higher safety glasses.
| Condition | Possible result |
|---|---|
| Heel | Flattened or spread |
| Chainsaw cut | Deep damage |
| Impact | Plastic fragments |
Replace any wedge that’s heavily damaged or deeply cut by a chainsaw before felling. Use the specified striking tool, keep your stance stable, and stay outside the fall zone while driving the wedge. A damaged wedge can shed fragments on impact, so wear ANSI Z87.1-rated-or-higher safety glasses before beginning each felling cut.
Inspect for Wedge Mushrooming
How can you tell when a felling wedge needs replacing? Inspect its heel for mushrooming: an edge that flares or deforms after repeated hammer strikes. Wear safety glasses rated ANSI Z87.1 or higher during inspection and use; impacts can fracture plastic and send fragments toward your eyes.
Replace a wedge when its heel is heavily mushroomed or badly damaged. Also check faces for deep chainsaw cuts, and discard any wedge with a deep cut. Don’t rely on a service life: durability varies by brand, and damage—not age—determines whether the wedge remains fit for use.
Keep wedges in good condition so you can drive them to steer a tree or prevent bar pinch. If you spot deformation or damage, remove the wedge before striking it again.
Conclusion
Before you cut, assess the tree’s lean, hazards, and escape route. Choose wedges compatible with your saw, keep the kerf clear, and drive wedges with a sledgehammer to support the intended direction and reduce bar-pinch risk. Inspect wedges for mushrooming; replace damaged ones. After the tree falls, retrieve wedges only when it’s safe, and verify your escape path remains clear. If conditions are uncertain, stop and consult a qualified faller. Use protective equipment and follow your saw manufacturer’s instructions.