How to Use a Cant Hook to Roll and Lift Logs With Less Effort
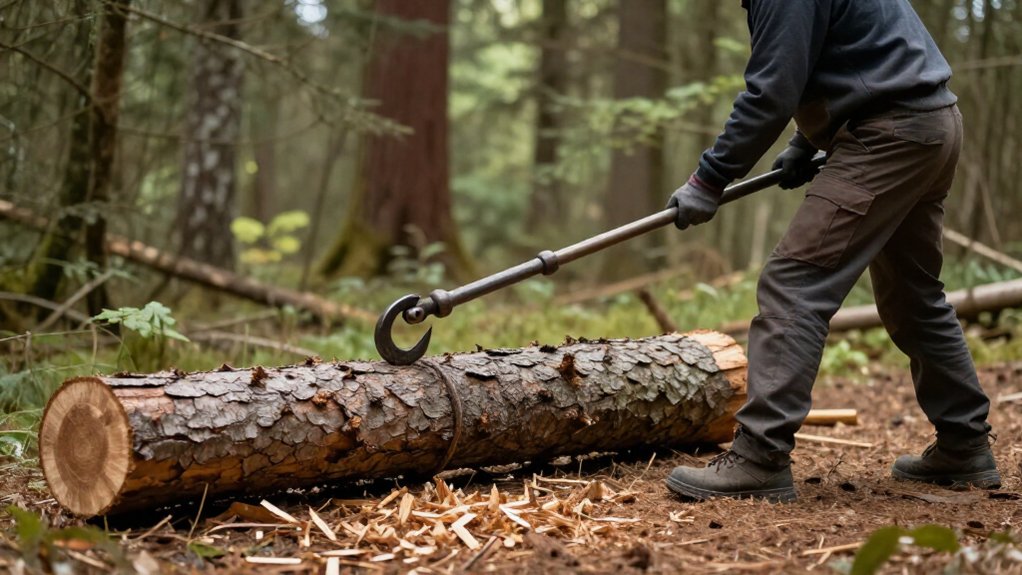
You can roll logs with less effort by using a cant hook’s long handle as a lever rather than lifting the log. Start on firm, level footing, clear debris, and keep bystanders outside its travel path.
Find where the log rests without tipping, then set sturdy stop blocks downhill. Seat the toe and dog against sound bark, apply smooth pressure, and pause if anything shifts. Chock the opposite side before resetting; more details follow.
Cant Hook Grip and Leverage
Set the cant hook’s toe against or beneath the log, then position the pivoting dog over it so the hook can bite securely. Raise the handle to engage the dog, then use the long handle as a lever to roll or reposition the log. Keep your feet shoulder-width apart and your stance balanced; apply smooth pressure instead of jerking the handle.
As the log moves, lower the handle to release the dog, then raise it to reset the dog for another bite. Repeat this sequence, placing each bite where the hook can hold firmly before applying leverage. The toe can also serve as a pivot when wedged beneath the log. Don’t treat the tool as a means to lift heavy logs; it’s designed mainly for rolling and positioning.
Safety Gear and Site Conditions
Before applying force, wear sturdy footwear and the protective equipment required for logging or chainsaw work, and choose firm, level footing. Then prepare the work zone:
- Check that the log rests stably; clear loose debris that could trip you or obstruct rolling.
- Keep bystanders outside the log’s travel path, and confirm you have room to control the tool without contacting nearby hazards.
- On wet, slushy, rocky, or uneven ground, slow down, reset your stance, and avoid sudden pulls.
Use a shoulder-width stance. Move the handle smoothly, applying steady force. If your footing shifts or the log moves unexpectedly, stop, regain footing, and reassess the site before continuing. Don’t work where debris, poor traction, or people prevent controlled movement.
Step 1: Identify the Log’s Balance Point
Once your footing and work zone are secure, identify where the log rests naturally without tipping or rolling. On uneven ground, assess balance from a stable stance before placing the cant hook. Observe how the log settles; stay clear of its downhill side, where it could roll unexpectedly.
Position the hook near the point where the log rests steadily. This placement gives you leverage and reduces the effort needed to start a roll. Don’t assume the point stays fixed on a long log. As it shifts, its supports and weight distribution can change.
Pause to reassess before applying force again, and keep your body clear of the downhill path. Maintain a stance that lets you control the handle without entering the log’s travel line.
Step 2: Set Rolling Stop Blocks
To keep the log from drifting downhill, place sturdy stop blocks on that side before you roll it.
Set them on firm, level ground, where they won’t rock, slide, or sink under load. Position blocks close enough to catch the log before it can roll past, but don’t put your hands or feet in the space between the log and a block. Match the stops to the log’s size and mass; a large, heavy log needs substantial blocks that won’t shift when struck.
Keep your stance clear of the log’s downhill path. Once the log reaches the blocks, ease pressure and confirm it sits securely. Don’t reposition the cant hook or begin a cut until the log remains stable. Recheck the blocks if the ground or log shifts.
Step 3: Hook the Log’s Bark
Set the cant hook’s pivoting dog against firm, intact bark so its point can bite securely as you apply pressure to the handle. Place the dog where bark is sound and firmly attached; loose or peeling bark can release under load. Align the hook squarely with the log rather than catching a loose flap or damaged patch.
Raise the handle to seat the dog’s point, then maintain a balanced stance with both feet on stable ground. Keep your body clear of the log’s anticipated path, and don’t place hands or feet where a slipping tool could strike them. If the point skates or loses purchase, ease pressure, reposition it on firmer bark, and raise the handle again. Don’t jerk the hook to force engagement.
Step 4: Roll, Lift, and Set the Log
Place the cant hook’s blunt toe beneath the log and its pivoting hook over the top, where it can grip securely. Raise the handle until the hook bites, then press it down smoothly to roll the log. Keep your feet balanced and clear of the log’s path; don’t reach or twist as you apply force.
For another roll, ease pressure, lift the hook, and reset it at a position. Use a leg to steady the log while you reposition the tool, keeping your body out of its travel path. To elevate the log for cutting, roll it onto poles or supports. This clearance helps keep your chainsaw chain out of dirt. Use the cant hook to roll and position logs, not lift heavy rounds.
Step 5: Wedge the Opposite Side
Before repositioning the cant hook, wedge the side opposite it with a stable chock to keep the log from rolling back, especially on uneven ground. Set the chock firmly against the log where it can resist movement without shifting or tipping. After each controlled roll, inspect the log and reseat the opposite-side wedge as needed before taking another bite.
When you’re ready to reposition the hook, keep its toe against the log, then raise the handle until the pivoting dog grips securely. Apply force only after that grip is established. Use controlled pressure, and pause if the chock moves or the log shifts under load. If you’re placing the log for bucking, verify the chock is firmly seated and outside the saw’s cutting path.
Step 6: Clear Debris From the Work Area
Clear the log’s rolling path of branches, loose rounds, stones, and other obstacles so it won’t snag or shift unpredictably. Remove debris near your feet and around the cant hook’s working area, leaving enough space to move the handle through its full controlled arc. Check the ground for uneven or slippery spots that could compromise your balance as you apply force.
If footing is unstable, clear loose material or reposition yourself before starting the roll.
Keep the area around the log stand or supports clear, too. After you reposition the log, it needs unobstructed contact with its supports to settle securely. Don’t leave tools, cutoffs, or other objects where the log could land or where you may need to step.
Recheck the path and work zone before each movement; debris can shift during handling.
Check for Bark Damage
Check the bark where the cant hook’s dog will bite, especially on valuable or live-edge logs where surface damage matters.
Before rolling, inspect the contact area and identify loose bark, cracks, or prior tears. Place the dog against a sturdy section that can support its teeth without pulling away under load. Apply steady pressure through the handle; don’t jerk it, because a sudden force can widen a tear or strip more bark. If the bite point is already damaged or loose, release the hook and reposition it on sound bark. This check helps you protect the log’s surface and keeps the dog seated in a reliable contact area. Keep your hands clear of the dog and handle while adjusting its position.
Slipping on Icy Bark
When bark is icy, the cant hook’s dog can slip instead of biting securely. Clear loose ice and snow from the contact area, then set the dog against exposed, solid bark or wood. Don’t rely on the hook until it holds a firm bite. Check that the dog stays seated as you load.
| Check | Action | Safety cue |
|---|---|---|
| Surface | Clear loose ice and snow | Expose solid wood |
| Dog | Set against firm bark or wood | Confirm its bite |
| Pressure | Apply slow, controlled force | Stop if the hook shifts |
If the hook moves, reposition it on a less slippery spot and take another bite before rolling. Keep your feet on stable ground and stay clear of the log’s downhill path; a slipping hook can release the log unexpectedly. Don’t add force to compensate for poor contact.
Oil the Pivot Joint
To keep the cant hook’s pivot moving smoothly around the log, apply a small amount of oil to the joint and wipe away any excess so the handle and hook stay secure in your grip.
Before you roll a log, test the pivot by swinging the hook through its full range. It should move freely without sticking or scraping; a stiff joint can make it harder to reposition the hook and may disrupt your control. Keep the pivot clean and tight, and inspect it as part of your equipment check.
When movement begins to bind or feels rough, clean the joint and apply oil again. Use only enough lubricant to free the mechanism, then remove residue from the handle, hook, and nearby contact surfaces. Keep your footing stable and your hands clear of pinch points while checking the joint. Don’t force a resistant pivot under load; set the tool down and service it before continuing for controlled log handling.
Conclusion
With a cant hook, you can roll or lift a log with less strain when you control leverage and plan each move. Wear protective gear, assess footing and log stability, and clear the work area before you begin. Find the balance point, set stop blocks, and seat the hook firmly on sound bark. Don’t work on slick surfaces or force a slipping tool. Keep the pivot joint maintained, and reposition rather than reach or overexert.